
Ever wondered why your Ford Fiesta’s headlights stopped working, or why the radio suddenly went silent? It could be a blown fuse! Understanding your car’s fuse box is crucial for any Fiesta owner, whether you’re a seasoned mechanic or someone who prefers to DIY. This comprehensive guide will equip you with the knowledge and information needed to navigate the 2013 Ford Fiesta fuse box diagram like a pro.

Image: circuitdatamegan.z19.web.core.windows.net
The fuse box is essentially the nervous system of your vehicle, protecting its electrical components from overloads and preventing potential damage. When a fuse blows, it acts as a sacrificial lamb, diverting excess current away from your car’s delicate electrical circuits. By understanding the layout of your fuse box and knowing which fuse controls which component, you can quickly diagnose and resolve electrical issues without the need for expensive trips to the mechanic.
Unveiling the Fuse Box: Location and Contents
The 2013 Ford Fiesta features two fuse boxes: the under-hood fuse box and the passenger compartment fuse box. Let’s delve into each one to understand their contents and layout.
Under-Hood Fuse Box
Located in the engine compartment, usually in a black plastic box near the battery, the under-hood fuse box houses fuses that control the car’s most essential systems, including:
- Engine control
- Headlights and taillights
- Cooling fan
- Power steering
- Fuel system
The under-hood fuse box typically features a diagram on its cover, detailing the location and function of each fuse. This diagram serves as your roadmap to understanding the electrical connections within your Fiesta.
Passenger Compartment Fuse Box
Situated on the driver’s side of the dashboard, usually near the steering column, the passenger compartment fuse box handles fuses related to the car’s interior functionalities, such as:
- Radio and climate control
- Power windows and door locks
- Interior lighting
- Wiper system
- Instrument panel
Like its under-hood counterpart, the passenger compartment fuse box often has a diagram on its cover, guiding you through the maze of fuses and their corresponding circuits.
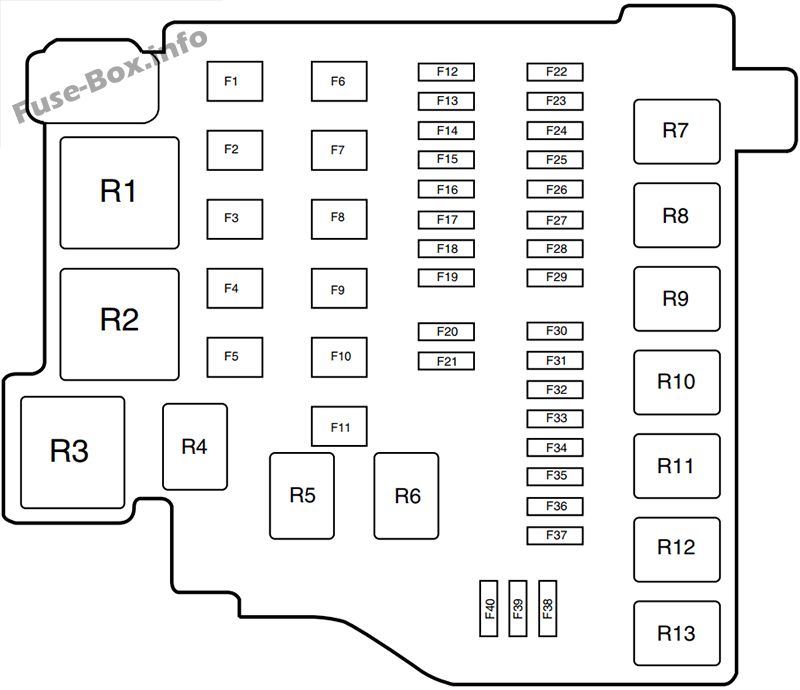
Image: fuses-diagram.com
Decoding the Fuse Diagram: A Visual Guide to Electrical Harmony
Understanding the fuse box diagram is crucial for accurately identifying and replacing blown fuses. The diagram typically uses a combination of symbols and numbers to represent each fuse and its corresponding connection. Here’s a breakdown of the elements you’ll encounter:
Fuse Number: Your Guide to Location
Each fuse is assigned a number that corresponds to its position within the fuse box. This number is crucial for quickly locating the fuse you need to inspect or replace.
Amperage Rating: Protecting Your Circuits
Every fuse has an amperage rating (usually expressed in amps), which indicates the maximum amount of current it can safely handle. A fuse blows when the current flow exceeds its rating, effectively preventing damage to your electrical system.
Component Symbols: Visual Clues for Function
The fuse box diagram often uses symbols to represent the components connected to each fuse. These symbols represent everything from headlights and taillights to power windows and the instrument panel, providing a clear visual link between the fuse and its controlled component.
Troubleshooting Fuse Issues: A Step-by-Step Guide
Now that you’re familiar with the basics of the fuse box and its diagram, let’s put your knowledge into practice. Here’s a step-by-step guide for troubleshooting electrical issues using your Fiesta’s fuse box:
Step 1: Identify the Problem
Begin by carefully observing the malfunctioning component. Are your headlights flickering? Does your radio have no power? Pinpoint the exact issue to narrow down your search.
Step 2: Consult the Diagram
Locate the corresponding fuse number for the problem component in the fuse box diagram. This number will direct you to the specific fuse you need to check.
Step 3: Inspect the Fuse
Carefully remove the indicated fuse from its slot and visually inspect it. Look for any signs of burn marks, broken filaments, or a completely melted fuse. If any of these signs are present, the fuse is blown.
Step 4: Replacing the Fuse
If you’ve identified a blown fuse, it’s time to replace it. Use a fuse of the same amperage rating to ensure proper protection for your circuit. Always turn off the ignition before replacing a fuse, and never use a piece of wire or other makeshift material in place of a dedicated fuse. Doing so can lead to dangerous overheating and potential fires.
Step 5: Test Functionality
After installing the new fuse, turn your ignition back on and test the previously malfunctioning component. If it now functions correctly, you’ve successfully resolved the issue.
Beyond Replacing Fuses: Advanced Troubleshooting Techniques
While replacing a blown fuse can often resolve electrical hiccups, there are instances where the problem lies deeper. If you’ve replaced the fuse and the issue persists, consider these advanced troubleshooting techniques:
Checking Circuitry
If the fuse continues to blow after replacement, there might be a short circuit in the wiring connected to that component. Using a multimeter, you can test the continuity of the circuit to identify any breaks or faulty connections. This requires a deeper understanding of electrical circuits and safety precautions should be taken.
Examining the Fuse Box Itself
In rare cases, the fuse box itself might be faulty. A corroded or damaged fuse box can cause intermittent or constant electrical problems. Inspect the fuse box for loose connections, corrosion, or any physical damage. If you suspect the fuse box as the culprit, it may be necessary to consult a qualified mechanic or electrician.
Ford Fiesta 2013 Fuse Box Diagram
Conclusion: Empowering Fiesta Owners
Armed with the knowledge of your 2013 Ford Fiesta’s fuse box diagram and the troubleshooting techniques outlined in this guide, you can take control of your car’s electrical system. By understanding the function of fuses and how to identify and replace them, you’ll be equipped to resolve minor electrical issues without relying solely on professionals. Remember, safety is paramount, so always refer to your owner’s manual for specific instructions and precautions before working with your vehicle’s electrical system. Happy troubleshooting!


